Massachusetts Real ID Application Form 2017-2026


What is the Massachusetts Real ID Application Form
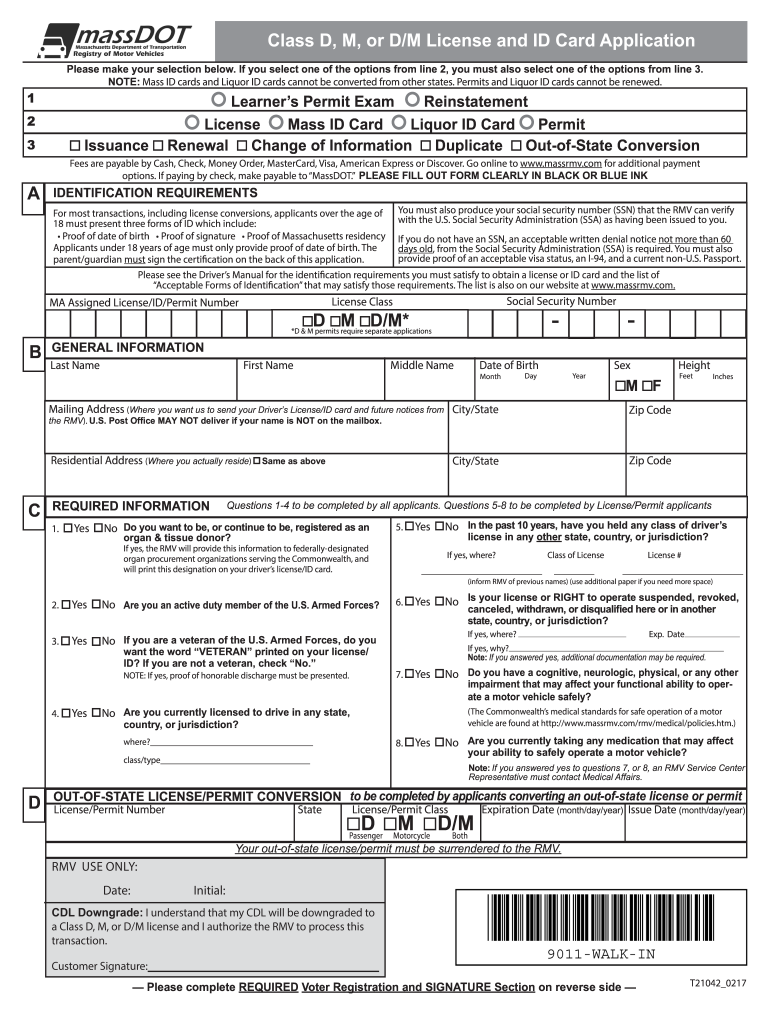
The Massachusetts Real ID Application Form is a legal document required for individuals seeking to obtain a Real ID-compliant identification card in Massachusetts. This form serves to verify identity and residency, ensuring that applicants meet the necessary criteria set by the state and federal regulations. A Real ID is essential for various purposes, including boarding domestic flights and accessing federal facilities. The application process involves providing personal information, proof of identity, and residency documentation.
Steps to Complete the Massachusetts Real ID Application Form
Completing the Massachusetts Real ID Application Form involves several key steps:
- Gather necessary documents, including proof of identity, Social Security number, and residency.
- Fill out the application form accurately, ensuring all information is complete and correct.
- Review the form for any errors before submission.
- Submit the form either online, by mail, or in person at a designated location.
Each step is crucial to ensure a smooth application process and to avoid delays in obtaining your Real ID.
Required Documents
To successfully complete the Massachusetts Real ID Application Form, applicants must provide specific documentation, including:
- Proof of Identity: This may include a U.S. passport, birth certificate, or other government-issued ID.
- Proof of Social Security Number: A Social Security card or a tax document that includes your Social Security number.
- Proof of Residency: This can be demonstrated through utility bills, bank statements, or lease agreements that display your name and address.
Ensuring all documents are valid and up-to-date is essential for a successful application.
Form Submission Methods
The Massachusetts Real ID Application Form can be submitted through various methods, providing flexibility for applicants:
- Online: Applicants can fill out and submit the form through the official Massachusetts RMV website.
- By Mail: Completed forms can be sent to the designated RMV address along with required documents.
- In-Person: Applicants may also visit a local RMV office to submit their application directly.
Choosing the right submission method can help streamline the application process based on individual preferences and circumstances.
Eligibility Criteria
To apply for a Massachusetts Real ID, applicants must meet certain eligibility criteria, which include:
- Being a resident of Massachusetts.
- Providing valid proof of identity and residency.
- Being at least 16 years old; minors require parental consent.
Meeting these criteria is essential for a successful application and to receive a Real ID that complies with both state and federal regulations.
Legal Use of the Massachusetts Real ID Application Form
The Massachusetts Real ID Application Form is legally binding and must be completed in accordance with state laws. It is designed to ensure that the identification issued complies with the standards set by the federal government under the Real ID Act. This form is crucial for individuals who wish to use their ID for activities such as air travel or accessing federal facilities. Submitting false information or failing to provide required documentation can result in penalties or denial of the application.
Quick guide on how to complete form t21042 2017 2019
Simplify your life by completing the Massachusetts Real ID Application Form with airSlate SignNow
Whether you need to title a new vehicle, obtain a driver’s license, transfer ownership, or perform any other task related to automobiles, handling such RMV documents as Massachusetts Real Id Application Form is an unavoidable requirement.
You have several avenues to obtain them: by mail, at the RMV service center, or online through your local RMV website and then printing them out. Each of these methods can be quite time-consuming. If you’re seeking a faster way to complete them and signNow them with a legally-recognized eSignature, airSlate SignNow is your optimal choice.
How to easily complete Massachusetts Real Id Application Form
- Click on Show details to view a brief overview of the form you are interested in.
- Select Get form to initiate and access the form.
- Follow the green tag indicating necessary fields if applicable.
- Utilize the upper toolbar and leverage our professional functionality options to modify, annotate, and enhance your form.
- Insert text, your initials, shapes and images, and additional elements.
- Choose Sign in in the same toolbar to generate a legally-binding eSignature.
- Review the form content to ensure it’s devoid of errors and inconsistencies.
- Press Done to complete the form submission.
Using our service to fill out your Massachusetts Real Id Application Form and other affiliated forms will save you considerable time and effort. Optimize your RMV form completion process from the very beginning!
Create this form in 5 minutes or less
Find and fill out the correct form t21042 2017 2019
FAQs
-
How do I fill out the CAT Application Form 2017?
CAT 2017 registration opened on August 9, 2017 will close on September 20 at 5PM. CAT online registration form and application form is a single document divided in 5 pages and is to be completed online. The 1st part of CAT online registration form requires your personal details. After completing your online registration, IIMs will send you CAT 2017 registration ID. With this unique ID, you will login to online registration form which will also contain application form and registration form.CAT Registration and application form will require you to fill up your academic details, uploading of photograph, signature and requires category certificates as per the IIMs prescribed format for CAT registration. CAT online application form 2017 consists of programme details on all the 20 IIMs. Candidates have to tick by clicking on the relevant programmes of the IIMs for which they wish to attend the personal Interview Process.
-
How do I fill out a CLAT 2019 application form?
Hi thereFirst of all, let me tell you some important points:CLAT 2019 has gone OFFLINE this yearBut the application forms for CLAT 2019 have to be filled ONLINEThe payment of the application fees also should be made onlineNow, kindly note the important dates:Note the details regarding the application fees:Here, if you want the Previous Year Question papers, Rs.500 would be added to the application fees.Apart from this, there would be bank transaction charges added to the application fees.The application fees is non-refundable.Note one important point here that before you fill the application form, check for your eligibility.To know the complete details of filling the application form along with other information like the eligibility - in terms of age, educational qualification, list of NLUs participating and the seats offered under each category, CLAT Reservation policies, CLAT exam pattern, marking scheme, syllabus, important documents required to be kept ready before filling the form, kindly go to the link below:How to fill CLAT 2019 Application form? Registration OPEN | All you need to knowTo know how to prepare for one of the very important section of CLAT exam, GK and Current Affairs, kindly go to the link below:How to prepare GK & Current Affairs for CLAT 2019To practice, daily MCQs on Current Affairs, kindly go to the link below:#CLAT2019 | #AILET2019 | #DULLB2019 | GK and Current Affairs Series: 5 in 10 Series: Day 12For any other queries, kindly write to us at mailateasyway@gmail.comThanks & Regards!
-
How do I fill out the NEET 2019 application form?
Expecting application form of NEET2019 will be same as that of NEET2018, follow the instructions-For Feb 2019 Exam:EventsDates (Announced)Release of application form-1st October 2018Application submission last date-31st October 2018Last date to pay the fee-Last week of October 2018Correction Window Open-1st week of November 2018Admit card available-1st week of January 2019Exam date-3rd February to 17th February 2019Answer key & OMR release-Within a week after examAnnouncement of result-1st week of March 2019Counselling begins-2nd week of June 2019For May 2019 Exam:EventsDates (Announced)Application form Release-2nd week of March 2019Application submission last date-2nd week of April 2019Last date to pay the fee-2nd week of April 2019Correction Window Open-3rd week of April 2019Admit card available-1st week of May 2019Exam date-12th May to 26th May 2019Answer key & OMR release-Within a week after examAnnouncement of result-1st week of June 2019Counselling begins-2nd week of June 2019NEET 2019 Application FormCandidates should fill the application form as per the instructions given in the information bulletin. Below we are providing NEET 2019 application form details:The application form will be issued through online mode only.No application will be entertained through offline mode.NEET UG registration 2019 will be commenced from the 1st October 2018 (Feb Exam) & second week of March 2018 (May Exam).Candidates should upload the scanned images of recent passport size photograph and signature.After filling the application form completely, a confirmation page will be generated. Download it.There will be no need to send the printed confirmation page to the board.Application Fee:General and OBC candidates will have to pay Rs. 1400/- as an application fee.The application fee for SC/ST and PH candidates will be Rs. 750/-.Fee payment can be done through credit/debit card, net banking, UPI and e-wallet.Service tax will also be applicable.CategoryApplication FeeGeneral/OBC-1400/-SC/ST/PH-750/-Step 1: Fill the Application FormGo the official portal of the conducting authority (Link will be given above).Click on “Apply Online” link.A candidate has to read all the instruction and then click on “Proceed to Apply Online NEET (UG) 2019”.Step 1.1: New RegistrationFill the registration form carefully.Candidates have to fill their name, Mother’s Name, Father’s Name, Category, Date of Birth, Gender, Nationality, State of Eligibility (for 15% All India Quota), Mobile Number, Email ID, Aadhaar card number, etc.After filling all the details, two links will be given “Preview &Next” and “Reset”.If candidate satisfied with the filled information, then they have to click on “Next”.After clicking on Next Button, the information submitted by the candidate will be displayed on the screen. If information correct, click on “Next” button, otherwise go for “Back” button.Candidates may note down the registration number for further procedure.Now choose the strong password and re enter the password.Choose security question and feed answer.Enter the OTP would be sent to your mobile number.Submit the button.Step 1.2: Login & Application Form FillingLogin with your Registration Number and password.Fill personal details.Enter place of birth.Choose the medium of question paper.Choose examination centres.Fill permanent address.Fill correspondence address.Fill Details (qualification, occupation, annual income) of parents and guardians.Choose the option for dress code.Enter security pin & click on save & draft.Now click on preview and submit.Now, review your entries.Then. click on Final Submit.Step 2: Upload Photo and SignatureStep 2 for images upload will be appeared on screen.Now, click on link for Upload photo & signature.Upload the scanned images.Candidate should have scanned images of his latest Photograph (size of 10 Kb to 100 Kb.Signature(size of 3 Kb to 20 Kb) in JPEG format only.Step 3: Fee PaymentAfter uploading the images, candidate will automatically go to the link for fee payment.A candidate has to follow the instruction & submit the application fee.Choose the Bank for making payment.Go for Payment.Candidate can pay the fee through Debit/Credit Card/Net Banking/e-wallet (CSC).Step 4: Take the Printout of Confirmation PageAfter the fee payment, a candidate may take the printout of the confirmation page.Candidates may keep at least three copies of the confirmation page.Note:Must retain copy of the system generated Self Declaration in respect of candidates from J&K who have opted for seats under 15% All India Quota.IF any queries, feel free to comment..best of luck
-
How do I fill out the Delhi Polytechnic 2017 form?
Delhi Polytechnic (CET DELHI) entrance examination form has been published. You can visit Welcome to CET Delhi and fill the online form. For more details you can call @ 7042426818
-
How can I fill out the BITSAT Application Form 2019?
BITSAT 2019 Application Forms are available online. Students who are eligible for the admission test can apply online before 20 March 2018, 5 pm.Click here to apply for BITSAT 2019Step 1: Follow the link given aboveStep 2: Fill online application formPersonal Details12th Examination DetailsTest Centre PreferencesStep 3: Upload scanned photograph (4 kb to 50 kb) and signature ( 1 kb to 30 kb).Step 4: Pay application fee either through online payment mode or through e-challan (ICICI Bank)BITSAT-2019 Application FeeMale Candidates - Rs. 3150/-Female Candidates - Rs. 2650/-Thanks!
Create this form in 5 minutes!
How to create an eSignature for the form t21042 2017 2019
How to create an eSignature for the Form T21042 2017 2019 online
How to generate an eSignature for your Form T21042 2017 2019 in Google Chrome
How to create an eSignature for signing the Form T21042 2017 2019 in Gmail
How to create an electronic signature for the Form T21042 2017 2019 from your smartphone
How to make an eSignature for the Form T21042 2017 2019 on iOS devices
How to make an eSignature for the Form T21042 2017 2019 on Android devices
People also ask
-
What is the Massachusetts Real ID Application Form?
The Massachusetts Real ID Application Form is a document required for residents of Massachusetts who wish to obtain a Real ID. This form enables individuals to apply for a driver’s license or state ID that complies with federal security standards. By filling out the Massachusetts Real ID Application Form, you ensure that you can travel domestically and access federal facilities without issues.
-
How do I fill out the Massachusetts Real ID Application Form?
To fill out the Massachusetts Real ID Application Form, you can visit the official Massachusetts government website or obtain it at a local RMV office. The form requires personal information, proof of residency, and identification documents. Make sure to double-check all entries before submission to avoid delays in processing your Real ID.
-
Is there a fee for the Massachusetts Real ID Application Form?
Yes, there is a fee associated with the Massachusetts Real ID Application Form. The cost varies depending on whether you are applying for a new license or renewing an existing one. It’s important to check the current pricing on the Massachusetts RMV website to ensure you have the correct amount ready when submitting your application.
-
What documents do I need to submit with the Massachusetts Real ID Application Form?
When submitting the Massachusetts Real ID Application Form, you need to provide documents that prove your identity, residency, and lawful presence in the U.S. This typically includes a birth certificate, Social Security card, and two documents that show your Massachusetts address, such as a utility bill or bank statement.
-
Can I apply for a Real ID online in Massachusetts?
Currently, you cannot fully complete the Massachusetts Real ID Application Form online; however, you can start the application process online. After filling out the form, you will need to visit a local RMV office to complete the application and present your documents in person.
-
How long does it take to receive my Real ID after submitting the application?
Once you submit your Massachusetts Real ID Application Form and all required documents at the RMV, you can expect to receive your Real ID by mail within 7 to 10 business days. However, processing times may vary, so it’s advisable to check with the RMV for the most current information.
-
What are the benefits of having a Massachusetts Real ID?
Having a Massachusetts Real ID provides several benefits, including the ability to board domestic flights and access federal buildings without needing additional identification. It enhances your identification security and ensures compliance with federal regulations. Additionally, a Real ID is a convenient way to have a government-issued ID that is widely accepted.
Get more for Massachusetts Real Id Application Form
- Genworth broker dealer change form
- Lincoln financial distribution request form
- Lincoln vulcv lincoln financial group form
- Chicago title north carolina form
- Litter application form american dog breeders association
- Oshacampuscom form
- Objection huron county probate and juvenile court form
- Tantre farm job application form
Find out other Massachusetts Real Id Application Form
- Can I eSignature Mississippi Business Operations Document
- How To eSignature Missouri Car Dealer Document
- How Can I eSignature Missouri Business Operations PPT
- How Can I eSignature Montana Car Dealer Document
- Help Me With eSignature Kentucky Charity Form
- How Do I eSignature Michigan Charity Presentation
- How Do I eSignature Pennsylvania Car Dealer Document
- How To eSignature Pennsylvania Charity Presentation
- Can I eSignature Utah Charity Document
- How Do I eSignature Utah Car Dealer Presentation
- Help Me With eSignature Wyoming Charity Presentation
- How To eSignature Wyoming Car Dealer PPT
- How To eSignature Colorado Construction PPT
- How To eSignature New Jersey Construction PDF
- How To eSignature New York Construction Presentation
- How To eSignature Wisconsin Construction Document
- Help Me With eSignature Arkansas Education Form
- Can I eSignature Louisiana Education Document
- Can I eSignature Massachusetts Education Document
- Help Me With eSignature Montana Education Word